You can create a free blog easier than you think, and free!
There is a long list of popular static blog systems, if you ask me, right now the top are GatsbyJS and Hugo.
Even though both are great, today I’m talking about Hugo as is less complex than GatsbyJS. Hugo is written in GO and it’s extremely fast building static pages. You can check the full list of features here.
To host it we’ll use Netlify, it’s super easy to use and free!
First, create the Netlify account, as we will need it to deploy our blog. Go to the dashboard and add a new site with CD (Continuous Deployment), so when uploading a new change to your blog, Netlify will update the web automatically.
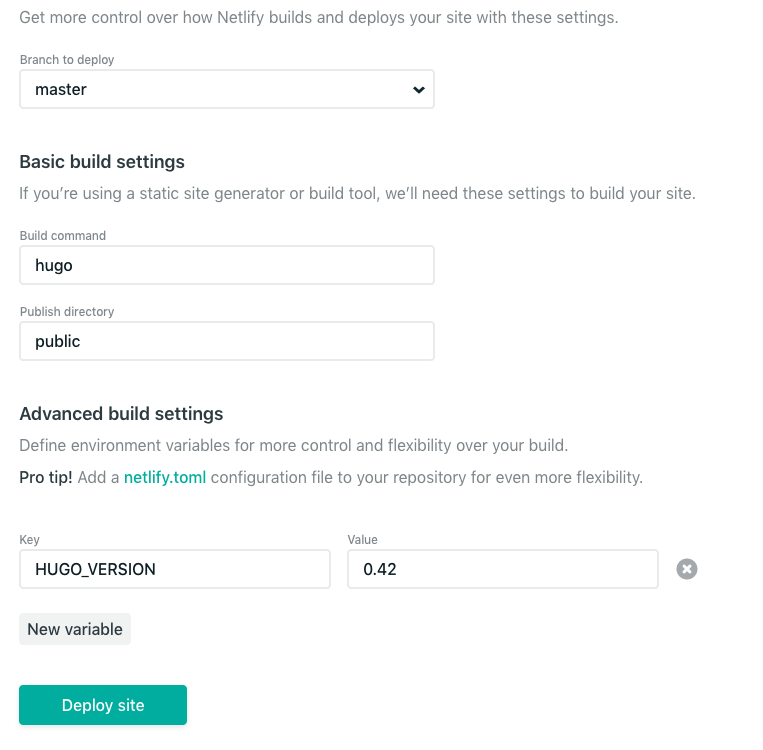
When creating the new site, choose your Git provider, most of the people use Github or Bitbucket. Choose your repository and configure it, check the image below, you will need to provide a similar configuration. The chosen branch is the ‘watched’ branch that will trigger deploys.

Now, you have to create inside your repository the structure for the blog. Open a terminal located in the repository folder.
Install locally Hugo:
brew install hugo
Create a new site (choose a proper name):
hugo new site awesome-new-site
One of the most important pieces in your blog is the theme, choose one and add it as a submodule to your repository:
git submodule add https://github.com/budparr/gohugo-theme-ananke.git themes/ananke
echo 'theme = "ananke"' >> config.toml
Once you have your Hugo blog configured and with a theme, you can create new posts:
hugo new posts/my-first-post.md
Final step, upload changes to the repository, Netlify will build it and deploy it. Congratulations! Your blog is online!
I’m not explaining how to use your own domain, as Netlify has done a good job with their guides.
If you get lost, check the Quick Start